


|
| |
After downloading and installing the Core FTP program, you need to put in the user ID, server and password info to access our website files. I will provide you the information to put into each space.
Open the CoreFTP program. The top of the page will look like this: ↓

You should see another window ↓ named "Site Manager or New
Site Manager".
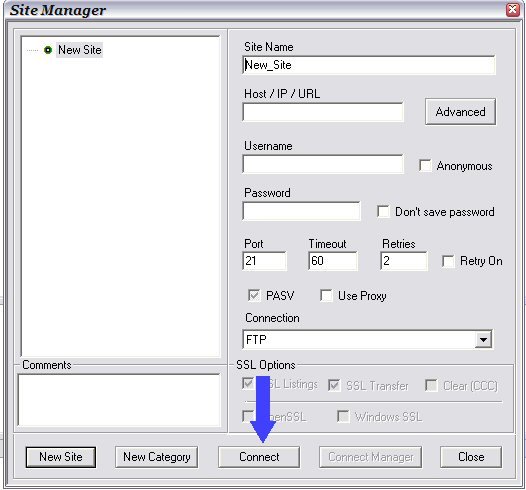 The
site manager is where you'll put the user ID, server and password... which
must be in all small letters. After putting the information in Core, click
connect, as shown by the blue arrow. → → → → → → → →
The
site manager is where you'll put the user ID, server and password... which
must be in all small letters. After putting the information in Core, click
connect, as shown by the blue arrow. → → → → → → → →
After you've clicked on "connect", left click twice on public_html. ↓
In order to upload html files and photos to the server, if you haven't already done so, make a folder for your county {in small letters}, then make another folder for each cemetery, again in small letters. In each cemetery folder, make a separate folder and name it pic, in small letters...this is for any photos you need to put online. All photos must be named in small letters, such as costnermk.jpg. Also, make a folder and name it zfolder....this is a folder where sometimes another area coordinator may put obits, photos, information etc. for your county. I've placed an obit template, photo template and permission list in your zfolder. The permission list is the names of funeral homes, newspapers etc. who have given us permission to post their obituaries on the website...the list is updated periodically so be sure and check the list from time to time....I'll give you the link to see the list.
The left side will show you what is on your computer, the right side will show what is on the server for your county.
If you do not see a listing of files on the right side, click on the little up arrow directly above the word "Filename" near the top of Core.
Make sure of the locations on your computer where you will be keeping the files for the county you are doing {such as c:\okcemeteries\lincoln - be sure you have the \ back slash... not the forward / slash}. For example: C:\okcemeteries\lincoln\arlington...each cemetery needs its own folder with a pic folder in each cemetery folder. All folders need to be named in SMALL letters as well as all photos..for example: costnerkm.jpg.
 Move the cursor over the icons
at the top of CoreFTP to know what each icon does.
Move the cursor over the icons
at the top of CoreFTP to know what each icon does.
This is the tool bar located at the top of CoreFTP. The first icon is the site manager. The second one is quick connect.
There are left and right blue arrows in the section between and above the left and right screens that transfer files to your computer or files to the server. To get started, you will need to download any files in your zfolder to your computer, plus the templates.htm, obit template and permisson list.
To upload or download the files, be sure the folder you want to send the files to is open. Example, the Z folder on your computer, listed on the left side is open. The address bar at the top of the file listing will indicate which folder you are in. It should say C:\okcemeteries\zfolders {or okcemetery or whatever you named that folder and zfolders etc.} Once you download them, it's best to put them in the county folder they belong in so they can be put online.
![]() Highlight the file you
want to copy {copy and move are interchangeable words for this purpose - if
picking from the left side, will upload to site if picking from the right side,
will download to your computer} On the blue arrows at the top of CoreFTP, click
the arrow for the direction you want to move the file {example left side file
highlighted, click on right arrow -> & it will move files from left to right -
from your computer to the server} do the opposite to move files from right to
left <- {sends files from server to your computer.} To highlight one file, just
single click on it. To highlight several files, put the cursor just to the right
of the first file you want to transfer, holding the left mouse button down, drag
the cursor to the last file name, release mouse button. When you click on the
arrow, all the highlighted files will be copied.
Highlight the file you
want to copy {copy and move are interchangeable words for this purpose - if
picking from the left side, will upload to site if picking from the right side,
will download to your computer} On the blue arrows at the top of CoreFTP, click
the arrow for the direction you want to move the file {example left side file
highlighted, click on right arrow -> & it will move files from left to right -
from your computer to the server} do the opposite to move files from right to
left <- {sends files from server to your computer.} To highlight one file, just
single click on it. To highlight several files, put the cursor just to the right
of the first file you want to transfer, holding the left mouse button down, drag
the cursor to the last file name, release mouse button. When you click on the
arrow, all the highlighted files will be copied.
If you want to download all the files in your folder on the server when you are in your county site {not the zfolders site} you can do this by highlighting everything on the right side {all the cemetery folders and files without opening each folder} be sure the address bar on the left side says c:\okcemeteries\yourcounty. This is helpful if you have not created the folders for each cemetery. Then click the left arrow and wait for all those files to be copied to your hard drive. Again, be aware that this will copy everything in your county folder from the server to your computer.
For those newspapers that have given us permission to use their obituary, you may include the entire obit, along with the newspaper name, publication date, and a link to the newspaper {See Permission file}. For those who have not given us permission, do not post the obit. Only an index that includes the following: Last Name, First & Middle Names, date of birth & death, funeral home, cemetery buried, date obit was published, Newspaper name, city, state. If it was published BEFORE 1923, we can publish the entire obit without permission.
Also do not change the xhead.htm or the xok.htm files or your pages won't have the okcemeteries logo and other stuff at the top of the page. If there is an xfoot.htm file in any of your folders you might look at that to see if you need to change the name & email address to yours. Not everyone uses the xfoot.htm file. At the bottom of every page {if xfoot.htm is not used} is the updated info, copyright etc. which has Tammie's email address. You need to change it to yours. Let me know if it needs changed and I'll help you change it.